Gorgeous Photo-real Salon Sponge Nails - Sponge nail art - featuring nail art, red - nail art inspiration and design ideas
Gorgeous Photo-real Salon Sponge Nails
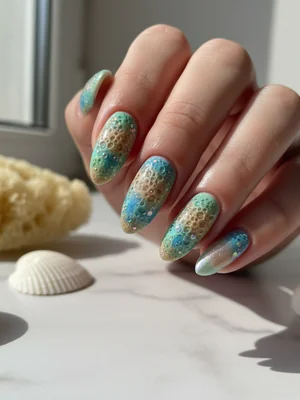
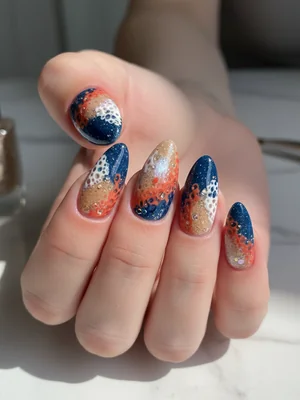
Gorgeous Photo-Real Salon Sponge Nails: Ethereal Blend
Experience the artistry of our Gorgeous Photo-real Salon Sponge Nails, a design that transcends traditional gradients. This sophisticated manicure features a multi-tonal, ethereal blend achieved through expert sponging, creating a stunning visual depth that looks almost painted onto the nail. The professional salon quality finish ensures a flawless, polished look that will turn heads.
- Gel Base Coat
- Dusty Periwinkle Gel Polish
- Muted Sage Green Gel Polish
- Creamy Off-White Gel Polish
- High-Density Makeup Sponge
- Detail Brush for Cleanup
- No-Wipe Gel Top Coat
- Prep nails (file, push cuticles, cleanse) and apply a thin layer of gel base coat, cure under UV/LED lamp.
- Apply one coat of Creamy Off-White gel polish as the lightest base, cure. This enhances the 'photo-real' vibrancy.
- Carefully dab small amounts of Dusty Periwinkle and Muted Sage Green gel polish onto different sections of a dense makeup sponge. Gently 'blot' and 'roll' the sponge onto the nail, creating a soft, overlapping blend. Cure.
- Repeat sponging, applying thinner layers and adjusting color placement to build depth and achieve a seamless, multi-tonal 'photo-real' effect. Ensure smooth transitions. Cure after each layer.
- Use a detail brush dipped in rubbing alcohol/cleanser to clean up any polish on the skin around the cuticles and sidewalls for a salon-perfect edge.
- Apply a generous layer of high-gloss, no-wipe top coat to seal the design and enhance its 'gorgeous, photo-real finish', then cure thoroughly for lasting shine and durability.
Expert Tip
Achieving the 'photo-real' depth is all about patience and layering. Use a very dense, fine-pored sponge and light, repetitive dabbing motions. Build up your colors gradually in thin layers, allowing each layer to blend subtly into the next for that truly seamless, sophisticated transition.
Similar Styles
Beautiful Photo-real Salon Sponge Nails
Sponge inspired nail art with beautiful, photo-real finish and professional salon quality

Beautiful Photo-real Salon Sponge Nails
Sponge inspired nail art with beautiful, photo-real finish and professional salon quality
Gorgeous Photo-real Salon Sponge Nails
Sponge inspired nail art with gorgeous, photo-real finish and professional salon quality
Stunning Photo-real Salon Sponge Nails
Sponge inspired nail art with stunning, photo-real finish and professional salon quality
Stunning Photo-real Salon Sponge Nails
Sponge inspired nail art with stunning, photo-real finish and professional salon quality
Sophisticated Photo-real Salon Sponge Nails
Sponge inspired nail art with sophisticated, photo-real finish and professional salon quality
Sophisticated Photo-real Salon Sponge Nails
Sponge inspired nail art with sophisticated, photo-real finish and professional salon quality
Photo-real Salon Sponge Nails
Sponge inspired nail art with elegant, photo-real finish and professional salon quality
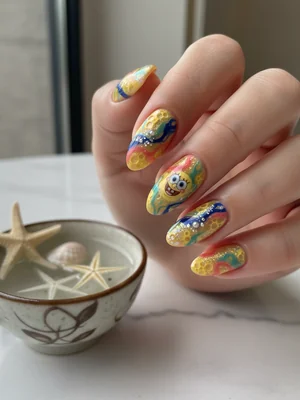
Photo-real Salon Sponge Nails
Sponge inspired nail art with elegant, photo-real finish and professional salon quality

Photo-real Salon Sponge Nails
Sponge inspired nail art with clean, photo-real finish and professional salon quality

Photo-real Salon Sponge Nails
Sponge inspired nail art with clean, photo-real finish and professional salon quality

Photo-real Salon Sponge Nails
Sponge inspired nail art with clean, photo-real finish and professional salon quality
Explore Similar Designs
Colors in this Design
Techniques Used
Perfect For
Nail Shapes
Frequently Asked Questions
How long does this photo-real sponge design typically last?
With proper application and aftercare, this gel-based design can last 3-4 weeks without chipping or lifting, maintaining its gorgeous salon quality.
Can I achieve the 'photo-real' finish at home?
Achieving the true 'photo-real' depth and seamless blend requires advanced techniques, specific tools, and practice, making it challenging for beginners to replicate the salon quality at home.
What makes this particular sponge design 'photo-real'?
The 'photo-real' aspect comes from the meticulous layering and blending of multiple colors to create subtle variations in tone and texture, mimicking the depth and organic feel found in high-resolution photographs or fine art.
Are there specific colors recommended to enhance the 'gorgeous' factor?
We recommend sophisticated, multi-tonal palettes that create depth, like muted pastels, earthy tones, or jewel tones, combined with a contrasting highlight color to achieve a truly gorgeous and realistic blended effect.
Is this design suitable for shorter nails?
While the full 'photo-real' effect is best appreciated on medium to long nails, our artists can adapt the design for shorter nails, focusing on a more condensed yet still stunning blend.
Does this advanced sponging technique damage my natural nails?
When applied and removed by a professional using quality products, this technique is safe for your natural nails and will not cause damage.
Aftercare Tips
- ✓Avoid using nails as tools to prevent chipping or lifting of the gel layers.
- ✓Moisturize hands and nails regularly to keep them supple and prevent brittleness.
- ✓If any lifting occurs, refrain from picking and seek professional repair to avoid damage to the natural nail.
Safe Removal
- 1.Gently buff the top layer of the gel polish with a fine-grit nail file to break the seal.
- 2.Soak cotton balls in 100% acetone, place them on each nail, and wrap tightly with foil for 10-15 minutes.
- 3.Carefully push off the softened gel with a wooden cuticle pusher. If resistance occurs, re-soak; do not force.