
Photo-real Salon Ocean Nails - Ocean nail art - featuring nail art, red - nail art inspiration and design ideas
Photo-real Salon Ocean Nails
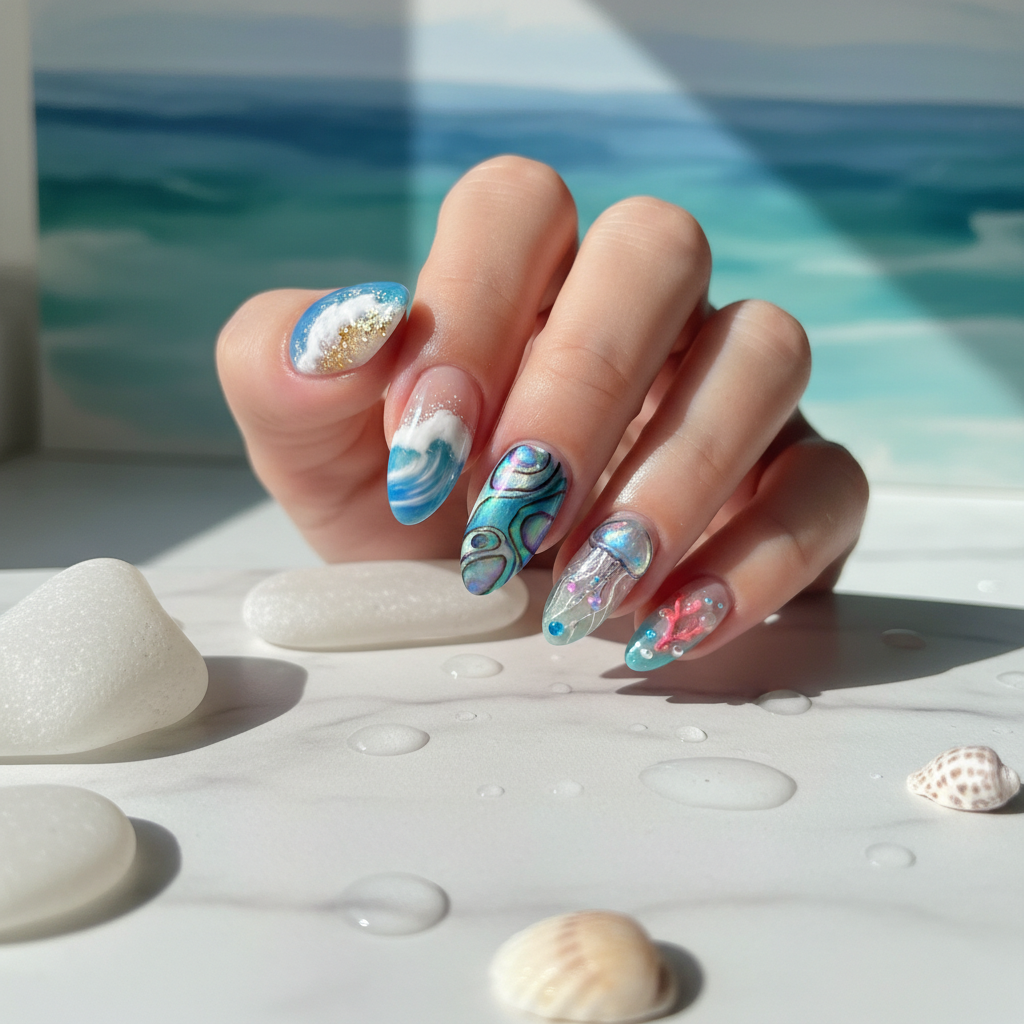
Photo-Realistic Ocean Wave Nails: Salon-Quality Art
Capture the raw power and beauty of the sea with this hyper-realistic ocean nail art. This design meticulously recreates crashing waves and deep blue waters, mimicking a photograph with its clean, high-gloss finish. It's a sophisticated, artistic interpretation of a classic theme, transforming your nails into miniature canvases.
- Sheer nude or clear builder gel for the base
- Multiple shades of blue gel polish (deep, medium, light)
- High-pigment white art gel
- Ultra-fine liner brush (00 size)
- Blooming gel
- High-gloss, non-wipe top coat
- Prep the nail and apply a sheer nude base layer, then cure. This creates a natural-looking foundation.
- Apply a thin layer of blooming gel (do not cure). Strategically dot shades of blue, allowing them to gently bleed together to create a realistic, deep-water effect. Cure fully.
- Using a fine liner brush and white art gel, begin painting the wave. Start with the crest, creating thin, wispy lines for motion. Use a stippling or dragging motion to create the sea spray and foam.
- Build dimension by adding more layers of white in key areas where foam would be thickest. Cure between thin layers to prevent running and create texture.
- Add subtle shadows under the white foam with a sheer, dark blue mix to make the wave pop and appear three-dimensional. Cure.
- Finish with two layers of a high-gloss top coat to encapsulate the design and create a durable, ultra-shiny 'wet' look. Cure each layer thoroughly.
Expert Tip
To achieve true photo-realism, work from a reference photograph of an ocean wave. Study how the light refracts through the water and where the foam is most dense to guide your white gel placement and shadowing.
Similar Styles


Explore Similar Designs
Colors in this Design
Perfect For
Nail Shapes
Frequently Asked Questions
Can this design be done on short nails?
Due to the intricate detail, this design is best suited for medium to long nails, which provide a larger canvas. On short nails, the effect may look crowded and less realistic.
How long does a photo-real ocean manicure last?
When created with professional-grade gel products and with proper aftercare, this manicure can last 2-4 weeks without chipping.
What makes this design 'photo-real'?
The realism comes from advanced techniques: layering colors for depth, using fine-line brushes for texture in the sea foam, and adding shadows and highlights to create a 3D effect that mimics a photograph.
Is this done with regular polish?
No, this effect is achieved using gel polishes and specialized art gels. Gels can be layered and manipulated without drying, which is essential for blending and creating detailed effects.
Can I request a matte finish for this design?
While possible, a high-gloss finish is strongly recommended. The shine mimics the natural wetness of water and enhances the design's depth and realism, making the colors pop.
Is every nail identical in this set?
Typically, no. To create a more natural and artistic look, each nail will feature a slightly different section or angle of the wave, creating a panoramic ocean scene across your hands.
Aftercare Tips
- ✓Apply cuticle oil daily to keep the skin around your nails hydrated and healthy, which frames the art beautifully.
- ✓Moisturize your hands regularly to complement your salon-quality manicure.
- ✓Be gentle with your nails for the first 24 hours as the gel fully settles and bonds.
- ✓Avoid prolonged exposure to hot water, such as in hot tubs, which can potentially affect the gel's longevity.
Safe Removal
- 1.Gently file the top coat to break the seal, allowing the acetone to penetrate the gel layers.
- 2.Soak a cotton ball in 100% acetone, place it on the nail, and wrap securely with aluminum foil for 15-20 minutes.
- 3.Carefully unwrap and use an orangewood stick or cuticle pusher to gently remove the softened gel. Never force or peel it off to avoid damaging the natural nail.