
Sophisticated Photo-real Salon Mermaid Nails - Mermaid nail art - featuring nail art, red - nail art inspiration and design ideas
Sophisticated Photo-real Salon Mermaid Nails
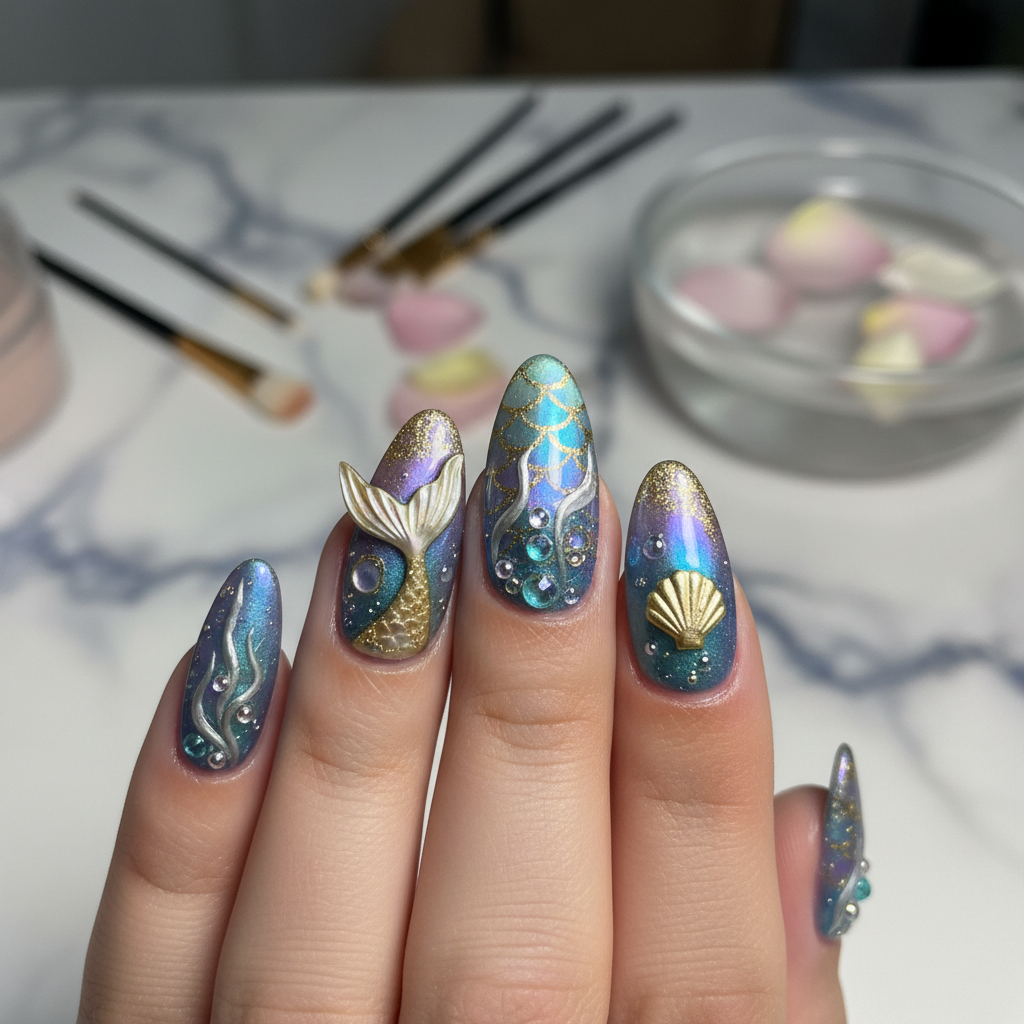
Photo-Real Mermaid Nails: Sophisticated Ocean Nail Art
Dive into elegance with our Photo-Real Mermaid Nails, a design that transcends typical glitter and scales. This sophisticated manicure uses advanced salon techniques to create a realistic, multi-dimensional underwater effect. It's less fantasy costume and more wearable art, capturing the subtle shimmer and depth of a mystical ocean scene.
- Professional 3D Sculpting Gel
- Fine Liner Art Brush (00 size)
- Airbrush and compatible water-based nail paints
- Silver or iridescent chrome powder
- Blooming Gel
- Multiple shades of teal, blue, and purple gel polish
- After proper nail prep, apply a base coat and 1-2 coats of a deep teal or blue base color, curing each layer.
- Apply a thin layer of blooming gel (do not cure) and dot on various shades of blue and white, allowing them to gently spread to create a watery background. Cure.
- Use an airbrush with a pearlescent white to create a soft gradient, mimicking light filtering through water. Cure.
- Using a fine liner brush and 3D sculpting gel, meticulously create individual, slightly overlapping scales, focusing on a few accent nails. Cure.
- Apply a no-wipe top coat over the 3D scales, cure, and then rub silver or iridescent chrome powder into the scales to create a realistic shimmer. Dust off excess.
- Encapsulate the entire design with a high-gloss top coat, ensuring you cover the sides of the 3D elements for durability. Cure thoroughly.
Expert Tip
To achieve unparalleled depth, apply a thin layer of sheer, blue-tinted building gel over your background art before creating the 3D scales. This 'sandwich' technique creates a genuine underwater illusion.
Similar Styles

Sophisticated Photo-real Salon Mermaid Nails
Mermaid inspired nail art with sophisticated, photo-real finish and professional salon quality

Photo-real Salon Mermaid Nails
Mermaid inspired nail art with elegant, photo-real finish and professional salon quality

Photo-real Salon Mermaid Nails
Mermaid inspired nail art with elegant, photo-real finish and professional salon quality

Sophisticated Photo-real Salon Mermaid Nails
Mermaid inspired nail art with sophisticated, photo-real finish and professional salon quality

Photo-real Salon Mermaid Nails
Mermaid inspired nail art with elegant, photo-real finish and professional salon quality

Photo-real Salon Mermaid Nails
Mermaid inspired nail art with clean, photo-real finish and professional salon quality

Photo-real Salon Mermaid Nails
Mermaid inspired nail art with clean, photo-real finish and professional salon quality

Photo-real Salon Mermaid Nails
Mermaid inspired nail art with clean, photo-real finish and professional salon quality

Photo-real Salon Mermaid Nails
Mermaid inspired nail art with clean, photo-real finish and professional salon quality

Photo-real Salon Mermaid Nails
Mermaid inspired nail art with clean, photo-real finish and professional salon quality

Photo-real Salon Mermaid Nails
Mermaid inspired nail art with clean, photo-real finish and professional salon quality
Explore Similar Designs
Colors in this Design
Techniques Used
Perfect For
Nail Shapes
Frequently Asked Questions
How long does a photo-real mermaid manicure last?
With proper care, this gel-based design can last 3-4 weeks without significant chipping or lifting, though a fill is recommended after 2-3 weeks for maintenance.
Can this design be done on natural nails?
Due to the complexity and multiple layers, this design is best suited for gel extensions or a structured gel overlay on strong natural nails to provide a durable and smooth canvas.
Is the 3D texture bothersome in daily life?
The 3D scales are sculpted to be smooth and are fully encapsulated with a top coat, creating a low profile that shouldn't snag on hair or clothes.
What makes this design 'photo-real'?
The term 'photo-real' refers to the use of advanced techniques like airbrushing for soft gradients, layering for depth, and realistic texturing to mimic how light and water interact, moving beyond flat, cartoonish representations.
Why is this design more expensive than other nail art?
The higher cost reflects the advanced skill level, premium products (like sculpting gel and chrome powders), and the significant amount of time required to create this detailed, multi-layered artwork.
How do I find a nail artist who can do this?
Look for nail technicians who specialize in advanced nail art. Check their portfolios for examples of 3D gel work, airbrushing, and hand-painting.
Aftercare Tips
- ✓Moisturize your hands and nails regularly to keep them healthy.
- ✓Avoid filing the nails yourself, as this can break the top coat's seal and lead to chipping.
- ✓If a 3D element feels loose, do not pick at it. Contact your nail artist for a repair.
- ✓Stay hydrated, as healthy nails start from within.
Safe Removal
- 1.Professional removal is strongly recommended to prevent damage to the natural nail due to the 3D gel.
- 2.The process involves carefully filing down the 3D elements and top coat before soaking the remaining gel in acetone.
- 3.Never pull or peel off the enhancements, as this will remove layers of your natural nail.