
Photo-real Salon Mermaid Nails - Mermaid nail art - featuring nail art, red - nail art inspiration and design ideas
Photo-real Salon Mermaid Nails
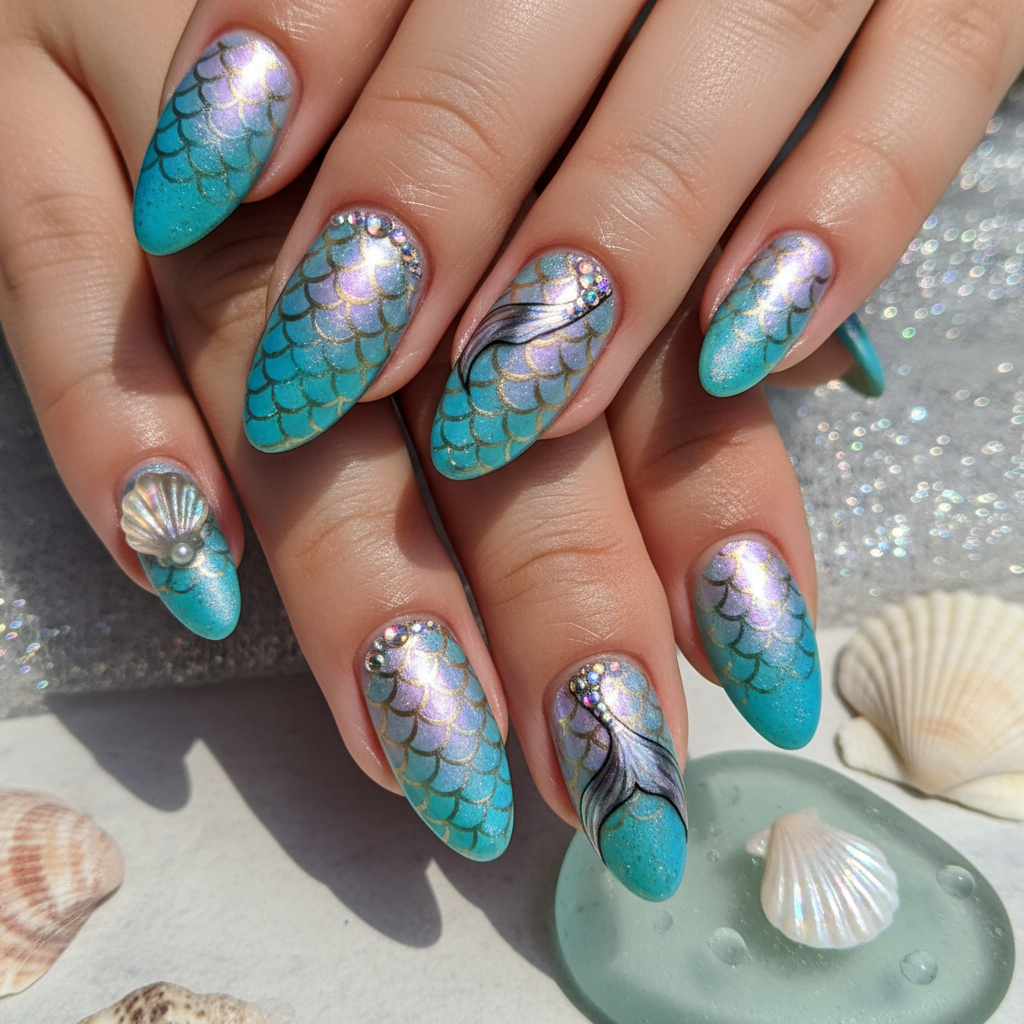
Salon-Quality Mermaid Nails: Photo-Real Design Tutorial
Dive into the deep blue with these stunning, salon-quality mermaid nails. This photo-realistic design captures the beauty of the ocean with intricate scales and shimmering colors, giving you a professional look at home.
Salon-Quality Mermaid Nails: Photo-Real Design Tutorial
Dive into the deep blue with these stunning, salon-quality mermaid nails. This photo-realistic design captures the beauty of the ocean with intricate scales and shimmering colors, giving you a professional look at home.
- Gel polishes (teal, aqua, seafoam green, iridescent white)
- Silver glitter powder
- Fine detail brush
- Mermaid scale nail stamping plate
- Stamper and scraper
- Gel top coat
- Apply a base coat and cure under a UV/LED lamp.
- Create an ombre effect using teal, aqua, and seafoam green gel polishes, curing after each layer.
- Using the stamping plate and iridescent white gel polish, stamp the mermaid scale design onto the nails and cure.
- Apply silver glitter powder to enhance the shimmer and cure.
- Clean up any excess polish around the cuticles.
- Finish with a gel top coat and cure for a high-gloss, long-lasting finish.
Expert Tip
Use a thin, even layer of stamping polish and a gentle rolling motion to transfer the intricate mermaid scale design perfectly. A sticky base coat for stamping can also improve results.
Similar Styles

Sophisticated Photo-real Salon Mermaid Nails
Mermaid inspired nail art with sophisticated, photo-real finish and professional salon quality

Photo-real Salon Mermaid Nails
Mermaid inspired nail art with elegant, photo-real finish and professional salon quality

Sophisticated Photo-real Salon Mermaid Nails
Mermaid inspired nail art with sophisticated, photo-real finish and professional salon quality

Photo-real Salon Mermaid Nails
Mermaid inspired nail art with elegant, photo-real finish and professional salon quality

Sophisticated Photo-real Salon Mermaid Nails
Mermaid inspired nail art with sophisticated, photo-real finish and professional salon quality

Photo-real Salon Mermaid Nails
Mermaid inspired nail art with elegant, photo-real finish and professional salon quality

Photo-real Salon Mermaid Nails
Mermaid inspired nail art with clean, photo-real finish and professional salon quality

Photo-real Salon Mermaid Nails
Mermaid inspired nail art with clean, photo-real finish and professional salon quality

Photo-real Salon Mermaid Nails
Mermaid inspired nail art with clean, photo-real finish and professional salon quality

Photo-real Salon Mermaid Nails
Mermaid inspired nail art with clean, photo-real finish and professional salon quality

Photo-real Salon Mermaid Nails
Mermaid inspired nail art with clean, photo-real finish and professional salon quality
Explore Similar Designs
Colors in this Design
Techniques Used
Nail Shapes
Frequently Asked Questions
Can I achieve this design with regular nail polish?
While possible, gel polish provides a longer-lasting and more durable finish. Stamping with regular polish requires speed and precision.
What if I don't have a stamping plate?
You can try freehand painting the scales with a fine detail brush, but it will require more skill and patience.
How do I create a smooth ombre effect?
Use a sponge or a brush to blend the colors together, working in thin layers and curing after each one.
Can I use regular glitter instead of glitter powder?
Yes, but glitter powder typically provides a smoother, more even finish. Ensure the glitter is encapsulated properly to avoid a gritty texture.
How can I protect my nails from damage during gel removal?
Avoid picking at the gel polish, and use a gentle cuticle pusher to remove the softened gel. Hydrate your nails and cuticles afterward.
What kind of lamp do I need for gel polish?
A UV or LED lamp specifically designed for curing gel polish is required. Make sure the wattage is sufficient for curing the polish properly.
Aftercare Tips
- ✓Moisturize hands and nails after removing the design.
- ✓Give your nails a break between gel applications.
- ✓Consider a strengthening nail treatment to promote healthy nail growth.
Safe Removal
- 1.File off the top layer of gel polish.
- 2.Soak cotton balls in acetone, place them on the nails, and wrap with foil for 10-15 minutes.
- 3.Gently push off the softened gel polish with a cuticle pusher.