Stunning Photo-real Salon Wedding Nails - Wedding nail art - featuring nail art, red, wedding - nail art inspiration and design ideas
Stunning Photo-real Salon Wedding Nails
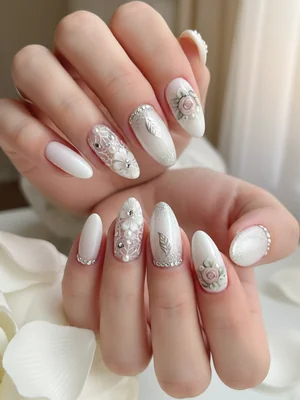
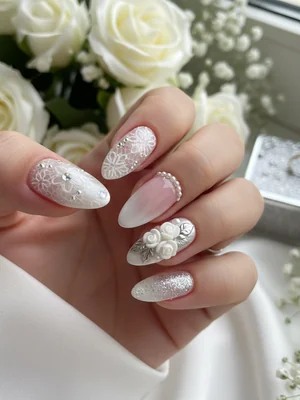
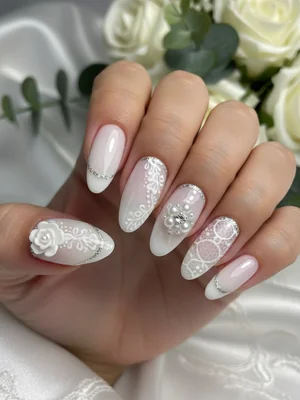
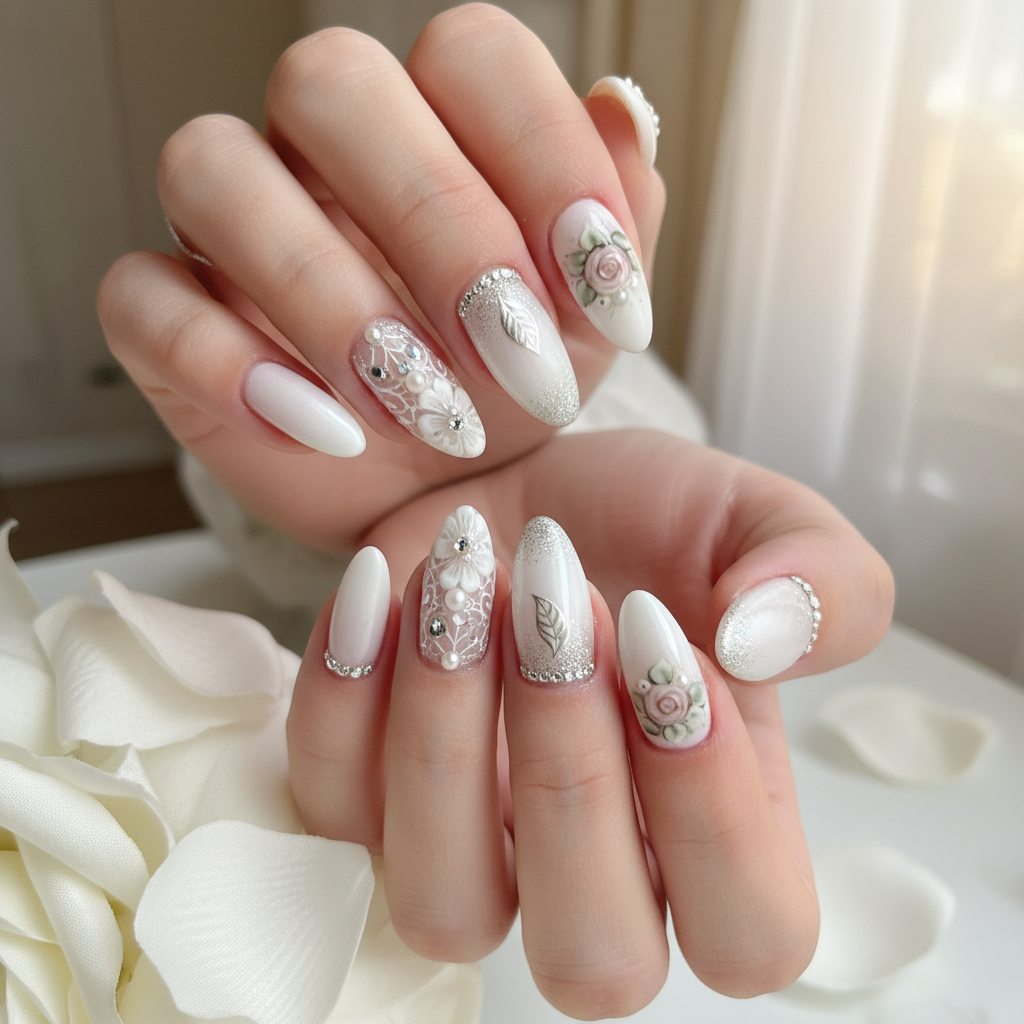
Elegant Photo-Real Bridal Lace Nails for Your Wedding Day
Embrace timeless elegance with our Photo-Real Bridal Lace nail design. This exquisite look features a sophisticated blush base, adorned with intricate, hand-painted white lace patterns for a truly salon-quality finish. Perfect for the discerning bride, it offers a stunning, realistic artistry that photographs beautifully.
- Gel base coat and non-wipe top coat
- Soft nude or blush pink gel polish
- Highly pigmented white gel art paint
- Ultra-fine detail nail art brush (000 or liner)
- UV/LED curing lamp
- Lint-free wipes and gel cleanser
- Begin with thorough nail preparation, then apply a gel base coat and cure under a UV/LED lamp.
- Apply two thin, even coats of the blush pink or soft nude gel polish, curing each layer completely.
- Using an ultra-fine detail brush and white gel art paint, meticulously hand-paint intricate lace patterns onto your chosen accent nails, focusing on delicate lines and filigree details for a 'photo-real' effect. Cure the design.
- Apply a high-gloss, non-wipe gel top coat over all nails, ensuring smooth coverage and encapsulating the artwork, then cure one final time for a brilliant, long-lasting shine.
- Cleanse any sticky residue with a gel cleanser and lint-free wipe, then nourish cuticles with a high-quality oil for a perfect finish.
Perfect For
Expert Tip
For truly photo-real results, invest in a high-quality, ultra-fine liner brush and practice your hand-painting technique on a swatch first. Apply multiple thin layers of design elements to create depth without bulk, ensuring every detail is crisp and defined.
Similar Styles
Beautiful Photo-real Salon Wedding Nails
Wedding inspired nail art with beautiful, photo-real finish and professional salon quality
Gorgeous Photo-real Salon Wedding Nails
Wedding inspired nail art with gorgeous, photo-real finish and professional salon quality

Sophisticated Photo-real Salon Wedding Nails
Wedding inspired nail art with sophisticated, photo-real finish and professional salon quality
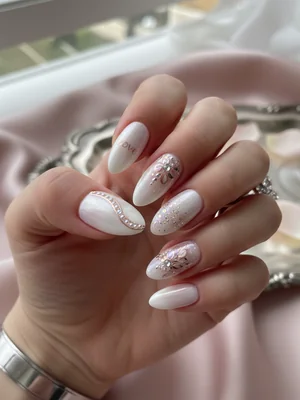
Photo-real Salon Wedding Nails
Wedding inspired nail art with elegant, photo-real finish and professional salon quality

Photo-real Salon Wedding Nails
Wedding inspired nail art with clean, photo-real finish and professional salon quality

Photo-real Salon Wedding Nails
Wedding inspired nail art with clean, photo-real finish and professional salon quality

Photo-real Salon Wedding Nails
Wedding inspired nail art with clean, photo-real finish and professional salon quality
Explore Similar Designs
Colors in this Design
Techniques Used
Perfect For
Nail Shapes
Frequently Asked Questions
How long does the photo-real lace design last?
With professional application of quality gel products and proper aftercare, this stunning design can typically last 2-3 weeks without chipping or fading, maintaining its intricate detail.
Is this design suitable for shorter nails?
While intricate designs often benefit from a medium length for optimal detail, a simplified lace accent can still look beautiful and elegant on shorter, well-manicured nails, perhaps focusing the art on one or two accent fingers.
Can I customize the lace pattern to match my wedding dress?
Absolutely! Your nail artist can work with you to analyze photos of your wedding dress or veil and create a custom lace pattern that beautifully complements its unique style, making your manicure truly bespoke.
Will the intricate design chip easily?
When applied correctly with professional gel products and a durable top coat, the delicate design is sealed within the gel layers, making it quite resilient to everyday wear, though care is always recommended.
What if I prefer a matte finish for my wedding nails?
While a high-gloss finish truly enhances the 'photo-real' effect, a matte top coat can create a unique, velvety interpretation of this lace design, offering a sophisticated and modern alternative for your wedding.
Is this design good for a winter wedding?
Yes, its timeless elegance makes it perfect for any season, including a winter wedding. Consider adding a subtle touch of silver shimmer or very fine glitter to the lace for a frosty, magical feel that complements winter themes.
Aftercare Tips
- ✓Avoid using your nails as tools (e.g., opening cans) to prevent chipping or breaking the delicate artwork.
- ✓Keep your nails and cuticles moisturized daily to prolong the fresh salon look and healthy appearance.
- ✓If any lifting or damage occurs, refrain from picking or peeling and contact your nail artist for a professional repair.
Safe Removal
- 1.Gently buff off the top layer of gel to break the seal, being careful not to reach your natural nail plate.
- 2.Soak nails in acetone-soaked cotton pads, securely wrapped in foil, for 10-15 minutes until the gel softens.
- 3.Carefully push off softened gel with an orange wood stick, then gently buff any remaining residue and apply a nourishing nail treatment.