Sophisticated Photo-real Salon Unicorn Nails - Unicorn nail art - featuring nail art, red - nail art inspiration and design ideas
Sophisticated Photo-real Salon Unicorn Nails
Sophisticated Photo-Real Unicorn Nails: Salon Quality Art
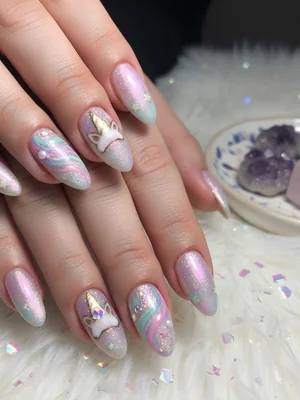
Experience the magic of a unicorn brought to life on your fingertips with our sophisticated photo-real salon unicorn nails. This exquisite design transforms mythical beauty into wearable art, featuring intricate details and a polished finish that truly captivates.
Sophisticated Photo-Real Unicorn Nails: Salon Quality Art
Experience the magic of a unicorn brought to life on your fingertips with our sophisticated photo-real salon unicorn nails. This exquisite design transforms mythical beauty into wearable art, featuring intricate details and a polished finish that truly captivates.
- High-pigment gel paints (various custom-blendable shades)
- Ultra-fine detail brushes (e.g., 000, liner, striper)
- Pearlescent and iridescent pigments
- UV/LED curing lamp
- High-gloss non-wipe gel top coat
- Gel base coat & dehydrator
- Perform full nail prep, apply gel base coat, and cure under UV/LED lamp.
- Apply a soft, gradient background using custom-blended pastel gel polishes, curing each layer thoroughly.
- Carefully sketch the unicorn's outline and main features with a light, opaque gel paint using a fine detail brush, then cure.
- Layer and blend gel paints meticulously to create the photo-real fur texture, horn shimmer, and intricate eye details, building up shadows and highlights for depth, curing after each significant layer.
- Add subtle pearlescent or iridescent pigments to selected areas (horn, mane) for an ethereal, magical sheen, then encapsulate with a thin layer of clear gel.
- Seal the entire design with a high-gloss, non-wipe gel top coat, ensuring full coverage, and cure thoroughly for a brilliant, long-lasting finish.
Expert Tip
For true photo-realism, build up layers of gel paint thinly and cure each layer completely to prevent bleeding and maintain sharp edges. Pay meticulous attention to light and shadow to create authentic depth and dimension in the unicorn's features, especially around the eyes and horn.
Similar Styles
Photo-real Salon Unicorn Nails
Unicorn inspired nail art with elegant, photo-real finish and professional salon quality

Sophisticated Photo-real Salon Unicorn Nails
Unicorn inspired nail art with sophisticated, photo-real finish and professional salon quality

Photo-real Salon Unicorn Nails
Unicorn inspired nail art with elegant, photo-real finish and professional salon quality

Sophisticated Photo-real Salon Unicorn Nails
Unicorn inspired nail art with sophisticated, photo-real finish and professional salon quality

Photo-real Salon Unicorn Nails
Unicorn inspired nail art with elegant, photo-real finish and professional salon quality

Photo-real Salon Unicorn Nails
Unicorn inspired nail art with clean, photo-real finish and professional salon quality

Photo-real Salon Unicorn Nails
Unicorn inspired nail art with clean, photo-real finish and professional salon quality

Photo-real Salon Unicorn Nails
Unicorn inspired nail art with clean, photo-real finish and professional salon quality

Photo-real Salon Unicorn Nails
Unicorn inspired nail art with clean, photo-real finish and professional salon quality

Photo-real Salon Unicorn Nails
Unicorn inspired nail art with clean, photo-real finish and professional salon quality

Photo-real Salon Unicorn Nails
Unicorn inspired nail art with clean, photo-real finish and professional salon quality
Explore Similar Designs
Colors in this Design
Perfect For
Nail Shapes
Frequently Asked Questions
How long does photo-real unicorn nail art typically last?
With professional application of gel products and diligent aftercare, this sophisticated design can last beautifully for 3-4 weeks before requiring a fill or safe removal.
Can I get this intricate design on shorter nails?
While technically possible, the intricate detail required for photo-realism is best showcased on medium to long nail lengths to allow ample canvas for the artistic elements and maximum impact.
Is the unicorn image created with stamping or is it hand-painted?
This unique, sophisticated design is entirely hand-painted by a skilled artist using fine detail brushes and specialized gel paints to achieve its breathtaking photo-real quality.
What makes this particular unicorn design 'sophisticated'?
The sophistication comes from the nuanced shading, expert color blending, and meticulous fine artistry used to create depth, realism, and an elegant aesthetic that transcends typical cartoonish unicorn interpretations.
Can the color palette of the unicorn or background be customized?
Absolutely! We encourage customization. The color palette can be adapted to perfectly complement your personal style, outfit, or event theme, from ethereal pastels to more dramatic hues.
Aftercare Tips
- ✓Hydrate your hands and cuticles regularly with a high-quality moisturizer and cuticle oil to keep your nails looking fresh.
- ✓Be mindful of how you handle objects to prevent direct impact on the detailed artwork, which could cause chipping.
- ✓Protect your nails from prolonged direct sun exposure, as strong UV rays can subtly fade the vibrant colors of the photo-real design.
- ✓If any lifting or chipping occurs, contact your nail technician promptly for a professional repair to avoid further damage.
Safe Removal
- 1.Gently buff off the top layer of the gel to break the seal, being careful not to over-buff the natural nail.
- 2.Soak cotton pads in acetone, place them directly on each nail, and secure with foil wraps for 10-15 minutes.
- 3.Gently push off the softened gel with a wooden cuticle pusher; never aggressively scrape or peel, which can damage the natural nail.